FARO Stream is free with use of a Focus Premium scanner and can be used with a free Base Sphere subscription. Focus Core scanners require either a paid Sphere subscription or standalone Focus Core access subscription. Contact DiCarlo Precision Instrument to purchase a subscription.
Using the Focus Core with Stream
Note: Stream App version 1.1 (or later) is required to connect your Focus Core scanner.
Focus Core scanners require either a paid Sphere subscription or standalone Focus Core access subscription. (Focus Premium scanners are licensed by default). After purchasing a subscription:
- Open the Stream app.
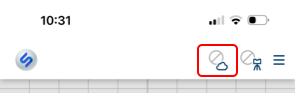
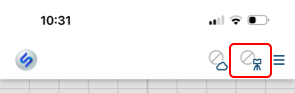
- Tap the top cloud icon and then log into your FARO Sphere account to retrieve the Focus Core license information.
|
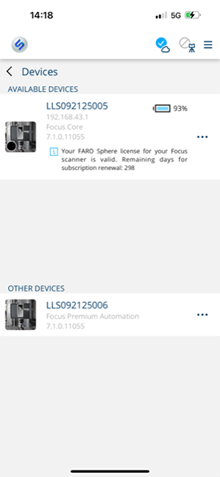
After a successful login to your FARO Sphere account the license information is now available to the Stream app, it will validate the Focus Core scanner when it is discovered, and will then be listed under Available Devices within the Stream app. After activating the license you can use the Focus Core without a connection to Sphere via a temporary offline license (temporary offline token) which will expire after 30 days from your last login to Sphere. Stream will show the offline license expiration date in the device list. The offline license is renewed each time you log into Sphere. |
Valid License
|
Offline Token
|
|
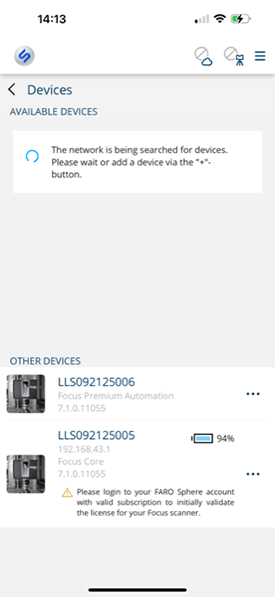
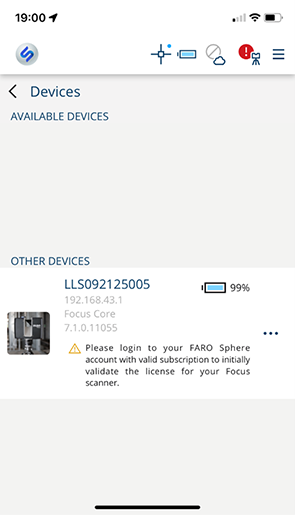
If no valid license is detected, the scanner will continue to be listed under Other Devices within the Stream app and additional information about your license status will be displayed in the device information text. You cannot activate and use a Focus Core scanner with Stream if the license is expired or invalid. |
License not detected
|
|

Scanner and Mobile Device Network Setup
The Stream app needs a network connection to the scanner. Decide which network configuration you want to use from the following three options:
Note: Scanner network settings are found under Manage > General Settings > WLAN.
- Connect both the mobile device and the scanner to an existing WiFi network.
- If a WiFi network is available and has the range that you need to complete your scan project, this is the best solution.
- Set up the scanner as an access point and connect your mobile device to the scanner.
- With this option you will not have an Internet connection, so it is not possible to immediately upload your scans to the cloud. Also note that if the connection to the scanner becomes weak, your mobile device may automatically switch to another network if available.
Note: When configuring the Scanner network settings, select the WLAN channel that you want to use. Channels 1-13 broadcast at 2.4 GHz, channels 36 and higher broadcast at 5 GHz. The 2.4 GHz channels are slower, but have more range. The 5 GHz channels are faster and are often less crowded, but have less range. The WLAN channel you select should be a channel that is not used by any other nearby WLAN router and that is least used by other WiFi networks. By using the least busy channel, your WiFi range and transfer rates should improve. (Tip: There are phone and PC apps that can help you determine which channels are the busiest. These apps can analyze the other WiFi channels and the signal strength (measured in dBm).
- With this option you will not have an Internet connection, so it is not possible to immediately upload your scans to the cloud. Also note that if the connection to the scanner becomes weak, your mobile device may automatically switch to another network if available.
- Set up your mobile device as an access point and connect the scanner to the phone.
- If you choose this option you will be connected to the Internet via your mobile device. Keep in mind if you upload scan data to the cloud, this can quickly use all the data in your data plan, or incur high costs if you have a metered data plan.
Connect to the Scanner
- Power on the Scanner and mobile device
- Connect the mobile device and scanner to the same WiFi network using one of the options listed above.
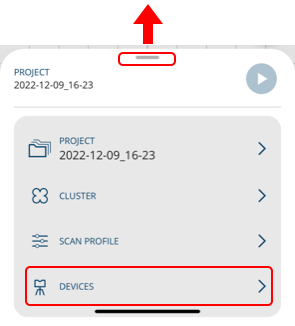
- Start the Stream app and access the Devices pane.
 If the network is configured to allow network discovery, an entry for the scanner will appear in the Stream app in a few minutes.
 - In the Device pane you will see different sections:
-
- Available Devices: Here you see all devices that Stream has discovered and which are currently available to connect to Stream. You can connect to a specific scanner by tapping it. Note that multiple connections are not supported so only one device can be connected at a time.
-
-
-
- Other Devices: Here you see all devices that Stream has previously discovered, but which are not currently available to connect to Stream. When the device becomes available, it will move to the Available Devices list above. Focus Core scanners are shown in Other Devices until they are licensed for use with the FARO Stream app.
-
Note: The user interface on the scanner is limited when the scanner is connected to the Stream app. However, you can still start a scan and access the inclinometer bubble (tap top left inclinometer icon).