Table of Contents
- Overview of Installation
- System Requirements
- Read this to keep your IT superhero from becoming a wrathful villain!
- If you don't have InTouch Installed
- If you already have InTouch Installed
- Download FARO Licensing Manager & FARO InTouch
- Licensing Manager User Interface
- Notifications
- Manage Licenses
- Activate License
- Configure Network (Server/Client)
- HASP Driver Update and Repair
| This article applies to: | ||
| SCENE |
2024, 2023, 2022, 2021, 2020, 2019, 2018, 7.x, 6.x, 5.x, 4.x |
|
| CAM2 |
2024, 2023, 2022, 2021, 2020, 2019, 2018, Measure 10, SmartInspect, Measure Q, Measure X |
|
| As-Built |
AutoCAD, Revit, Modeler |
|
| VirtuSurv |
VirtuSurv 2019, VirtuSurv 2018 |
|
| FARO Zone 3D |
2024, 2023, 2022, 2021, 2020, 2019, 2018 |
|
| FARO Zone 2D |
2024, 2023, 2022, 2021, 2020, 2018 |
|
| BuildIT |
Construction, Metrology, Projector |
|
| RevEng | RevEng | |
| Visual Impact | CAD Translator | |
Installation
The Licensing Manager can be installed via FARO InTouch. FARO InTouch is a software distribution and management application that streamlines the downloading, installation, updating, and execution of FARO software.
Follow the steps below to install the latest Licensing Manager and FARO InTouch version.
System requirements
The Licensing Manager only supports the x64 version of:
- Windows Server 2016
- Windows Server 2019
- Windows Server IoT 2019
- Windows Server 2022
- Windows Server IoT 2022
- Windows 10 IoT Enterprise 2019 LTSC
- Windows 10 IoT Enterprise 2021 LTSC
- Windows 10 22H2
- Windows 11 23H2
- Windows 11 ARM 23H2
Prevent your IT superhero from going full supervillain!
Follow these tips to save time, keep working, and keep your IT human sane.
***Important***
Before downloading or installing your FARO Software, please take the following steps:
- Consult - with your IT administrator to confirm that you have the necessary permissions to install the software.
- Verify - that your software maintenance plan has not expired before installing the new software version.
- The Manage Licenses screen displays all licenses currently installed on the computer. Each listing includes the expiration date.
- Confirm - that you have a stable internet connection.
- If you do not have access to the internet on the computer you are installing the software, skip to the Offline Manual License Update
- Turn off - all anti-virus and firewall software, which can affect the update process.
- Turn on—Be sure to turn it back on at the end of this process. If you don't know how to do it, contact your IT humans.
If you don’t have InTouch installed:
- Download the Licensing Manager and FARO InTouch.
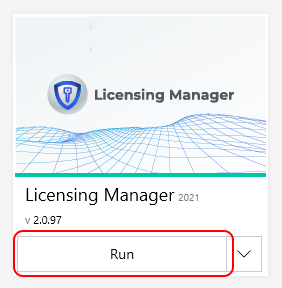
- Once installed, open FARO InTouch, locate the Licensing Manager application, and click Run.
If you already have InTouch installed:
1. Open FARO InTouch, locate the Licensing Manager application, and click Install. (Note: The Licensing Service application will also be installed automatically.)

2. Once the Licensing Manager application has been installed, click Run.

Licensing Manager User Interface

Notifications
The notifications pane contains a historical view of licensing-related activities. Clicking on any notification will display a pop-up window with additional details.

|
Listed below are some of the most common notifications:
|
Manage Licenses
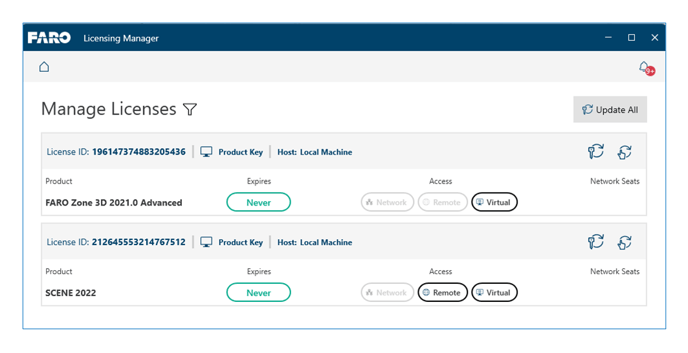
The Manage Licenses screen displays all licenses currently installed on the computer. Each listing includes the expiration date and related information. From this page, licenses can be updated online or offline.
***Important***
Before downloading or installing your FARO Software, please take the following steps:
- Consult with your IT administrator to confirm that you have the necessary permissions to install the software.
- Verify that your software maintenance plan has not expired before installing the new software version.
- The Manage Licenses screen displays all licenses currently installed on the computer. Each listing includes the expiration date.
- Confirm that you have a stable internet connection.
- If you do not have access to the internet on the computer you are installing the software, skip to the Offline Manual License Update
- Turn off all anti-virus and firewall software, which can affect the update process.
- Be sure to turn it back on again at the end of this process. If you don't know how, contact your IT department.
Online Manual License Update
- Open the Licensing Manager and click on Activate.

- On the next screen, enter your product key and click the Activate button.

- Once submitted, the software will automatically activate your license. This process requires a stable internet connection and successful communication with the FARO License server. If your license activation fails, these may be the reasons:
- You entered the product key incorrectly: Be sure you are using the Product Key supplied with your purchase. Verify you have entered the Product Key exactly as provided. Product Keys consist of either 18 or 20 alphanumeric characters in the following formats: GXPAF-DQPEC-VN6DQ-X5PJZ or OWSTEVIZPIAVP8CDA0. The Activate button won't become available if the product key entered is invalid.
- You are not connected to the internet. Please see the section below titled Offline Activation for instructions.
- You have activated the same key multiple times: If you are installing the software on a new computer and still have access to the old computer, you can transfer this license without the need to re-activate the software. See License Transfer for FARO Software. If you are unable to transfer the license, please contact FARO Support or Your DiCarlo Precision 3D Team
- Your PC has been reimaged or duplicated: Our licensing system detects PC/hard drive duplication. The licensing system will interpret this as a cloned instance and the FARO software license will be disabled and no longer be accessible. If you are receiving clone protection errors, please contact FARO Support or Your DiCarlo Precision 3D Team
Offline Activation:
If you need to activate your software on a computer without an internet connection, you can do so using another computer with internet access. This process requires creating a C2V file from the offline computer and then using the FARO Licensing Portal website to create a V2C license file. This V2C file can then be transferred to an offline computer (via a USB thumb drive or similar media).
- Open the Licensing Manager application and click on Activate.
 2. On the next screen, click on Offline Activation and follow the on-screen instructions.

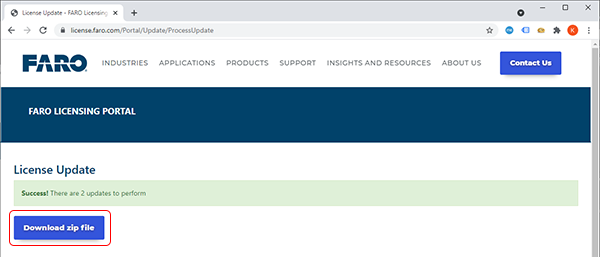
- The next screen will verify the update was successful, click the Download zip file button to download the updated license file. It will be in the format of "update_########_######.zip". Once the download is complete unzip the file.
- Copy the .V2C (from the .zip download) file to a USB thumb drive or similar media that will allow you to transfer it back to the offline computer where the software is installed.
On the offline computer:
- Insert the USB thumb drive or similar media that contains the V2C file downloaded in the previous section.
- Return to the Licensing Manager and click the
 (Apply License Update icon). Browse to the location where you saved the V2C file, select it and click Open.
 - The updated product/license key information will now be applied, and you may begin using your FARO software.
Activate License
Select Online Activation or Offline Activation
Online Activation
Most FARO® software requires a valid license to open and use it. As part of your FARO software purchase, you will receive a license key for single users as either:
- Product Key - An alphanumeric code that can be entered in a FARO software
- Dongle/Portlock - a physical USB device that looks like a memory stick.
-
- Most FARO software Dongle/Portlocks are shipped pre-activated.
This section will cover the ways you can activate your new single-user license with FARO products.
- If you are reinstalling or updating to a new version of software, please refer to the Manage Licenses section above.
- For network license activation, please refer to the Configure Network section below.
Before attempting to activate your license:
- Ensure you have stable internet connection. If not skip to the Offline License Activation section.
- Turn off all anti-virus and firewall software, as it can block the activation process. Be sure to turn it back on again at the end of this process. If you do not know how to do this, contact your IT department.
- Ensure you have administrator privileges on your computer.
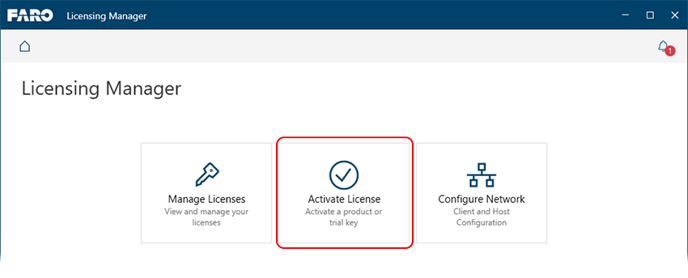
- When you start the application on a computer that does not have a valid license, the Licensing Manager application will appear. Click on Activate License.
- On the next screen enter your product key and click the Activate button.
- Once submitted, the software will automatically activate your license. This process requires a stable internet connection and successful communication to the FARO License server. If your license activation fails, there are a few cases in which this might occur.
- You entered the product key incorrectly. Be sure you are using the Product Key supplied with your purchase. Verify you have entered the Product Key exactly as provided. Product Keys consist of either 18 or 20 alphanumeric characters in the following formats: GXPAF-DQPEC-VN6DQ-X5PJZ or OWSTEVIZPIAVP8CDA0. If the product key entered is not valid, the Activate button won’t become available.
- You are not connected to the internet. Please see the section below titled Offline Activation for instructions.
- You have activated the same key multiple times. If you are installing the software on a new computer and still have access to the old computer, you can transfer this license without the need to re-activate the software. See License Transfer for FARO Software. If you are unable to transfer the license, please contact FARO Support.
- Your PC has been reimaged or duplicated: Our licensing system detects PC/hard drive duplication. The licensing system will interpret this as a cloned instance and the FARO software license will be disabled and no longer be accessible. If you are receiving clone protection errors, please contact FARO Support.
Offline Activation
If you need to activate your software on a computer that does not have an internet connection, you can do so using another computer that does have internet access. This process requires a creation of a C2V file from the offline computer and then using FARO Licensing Portal website to create a V2C license file. This V2C file can then be transferred to an offline computer (via a USB thumb drive or similar media).
Walkthrough Video
On the Offline Computer:
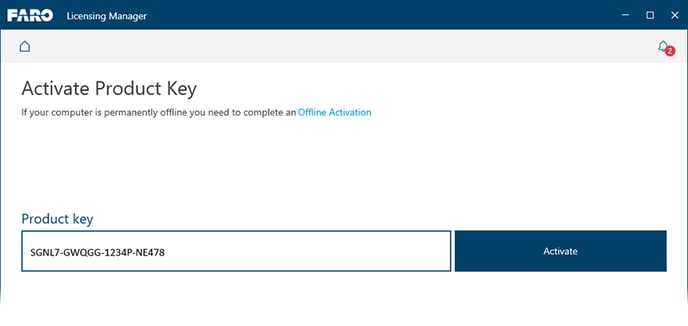
- Open the Licensing Manager application and click on Activate License.
.png?width=688&height=278&name=LicensingManager-HomeCrop-Activate%20(1).png)
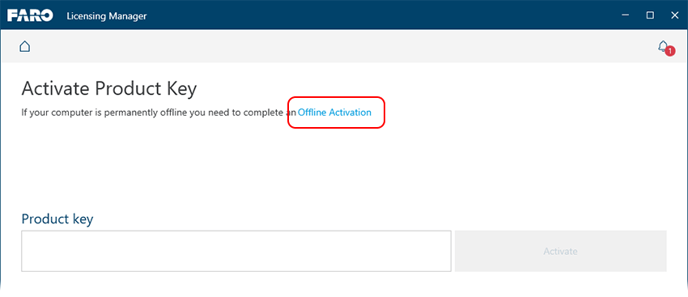
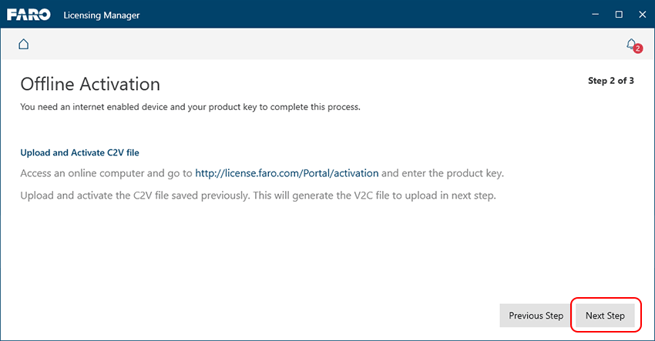
- On the next screen, click on Offline Activation.
- Depending on the software product you are activating, click on the appropriate "C2V File" button. Save the .c2v file to your computer.
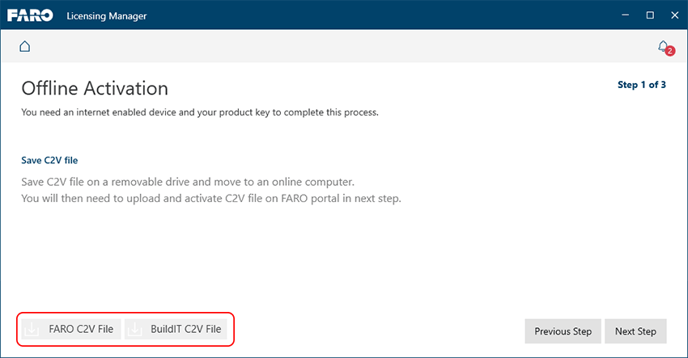
- Copy this file to a USB thumb drive or similar media that will allow you to transfer it to the online computer and then eject the USB thumb drive.
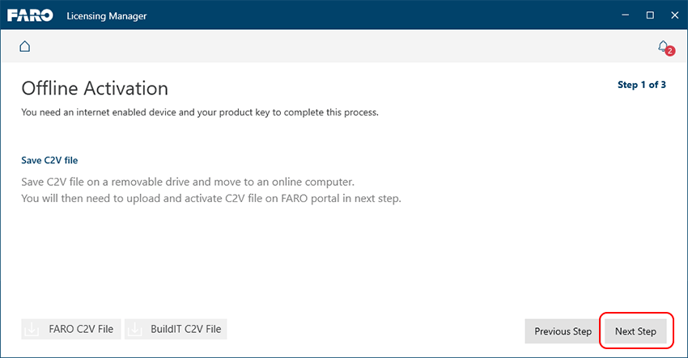
- Click Next Step.
On the Online Computer:
- Insert the USB thumb drive or similar media that contains the C2V file created in the previous section.
- Go the FARO Licensing Portal website.
- Click Browse and navigate to the location of the C2V file, select it and click Open.
- Paste the Product Key into the Insert Product Key field, and then click ACTIVATE.

- The next screen will verify the activation was successful, click the Download v2c file button to download the activated license file. It will be in the format of "activation_########_######.v2c"

- Copy this file to a USB thumb drive or similar media that will allow you to transfer it back to the offline computer where the software is installed.
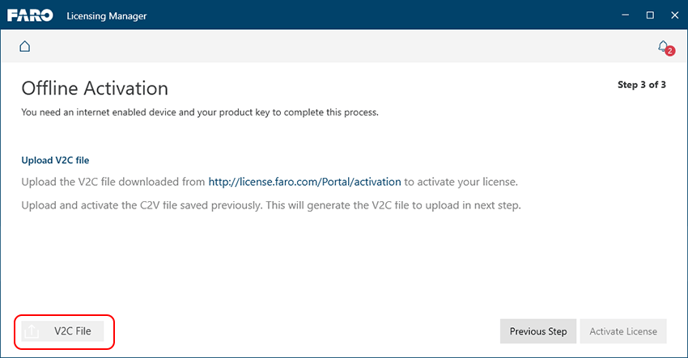
On the Offline Computer:
- Insert the USB thumb drive or similar media that contains the V2C file downloaded in the previous section.
- Return to the Licensing Manager application and click Next Step.
- Click the V2C File button and browse to the location where you saved the V2C file, select it and click Open.
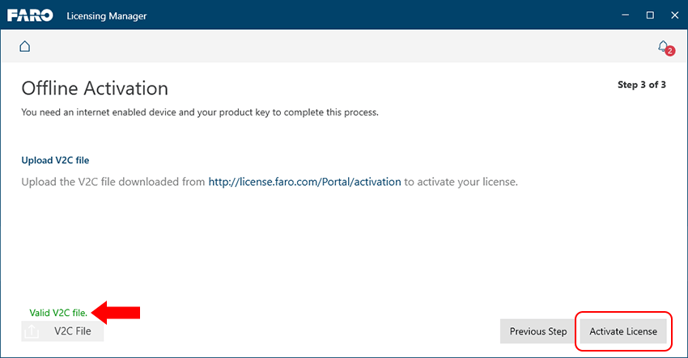
- The Licensing Manager will validate the chosen V2C file (red arrow), then click Activate License.
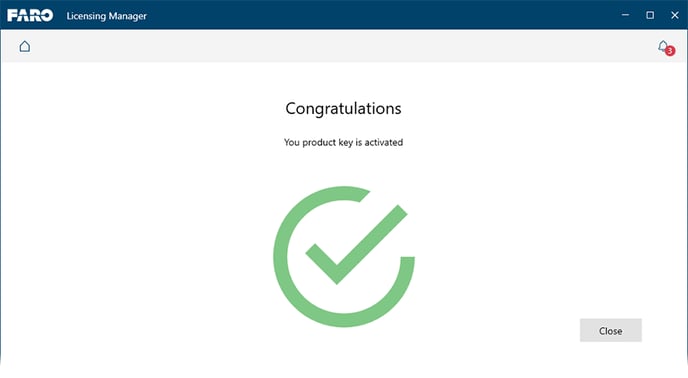
- The updated product/license key information will now be applied, and you may begin using your FARO software.
Configure Network (Server/Client)
Select Server/Host Configuration or Client Configuration.
Server/Host Configuration
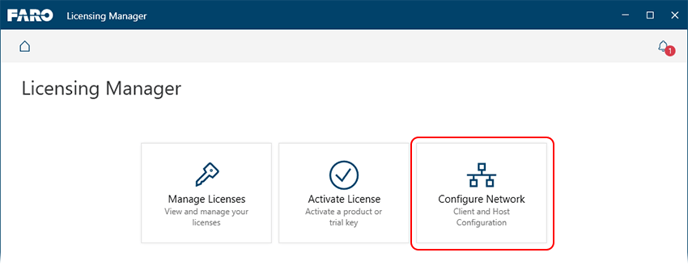
- Open the Licensing Manager and click on Configure Network. For more information on installing the Licensing Manager see the section Installation - Via FARO InTouch at the top of this article.
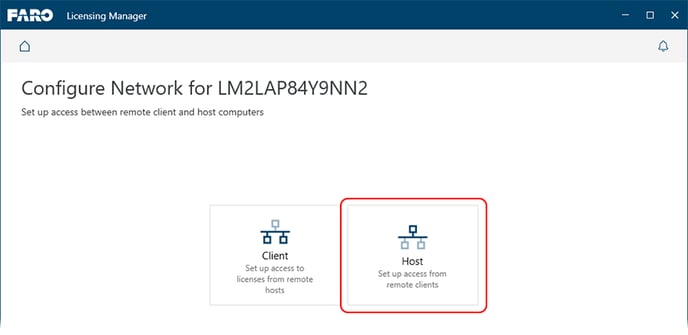
- Click on Host.
- Ensure the "Allow access from remote clients" slider is On.
- In the Client name/IP address field you may allow or deny specific clients. By default, all licenses are accessible without need of identity.
- For advanced configuration options, click on the Admin Control Center link (red arrow).

- On the server, click the Windows Start button and in the search field type Cmd then press Enter. The Command Prompt window appears.
- At the prompt, type ipconfig and press Enter. Write down the IPv4 Address listed under the appropriate Ethernet/Wireless LAN adapter. It will be required later to enable each client computer to access the license keys.
Activating/Updating Licenses
Activating or updating network type licenses is done in the same manner as local licenses, see the following sections for more information:
Client Configuration
- Download and install the FARO software on the client computers. Search this knowledge base for the download article for your FARO software. When the installation is complete, do not open the FARO software as it cannot yet access the remote keys.
- On each client computer:
- Open the Licensing Manager and click on Configure Network. For more information on installing the Licensing Manager see the section Installation - Via FARO InTouch at the top of this article.
.png?width=688&height=278&name=LicensingManager-HomeCrop-Network%20(1).png)
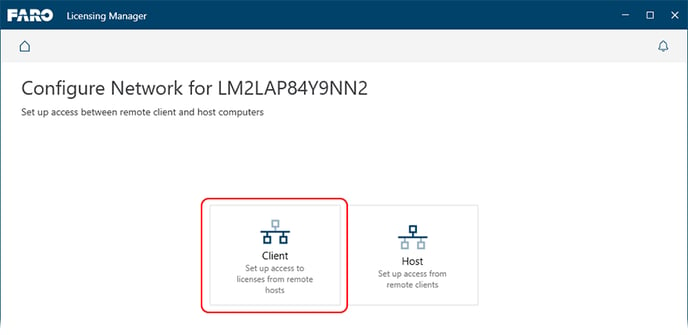
- Click on Client.
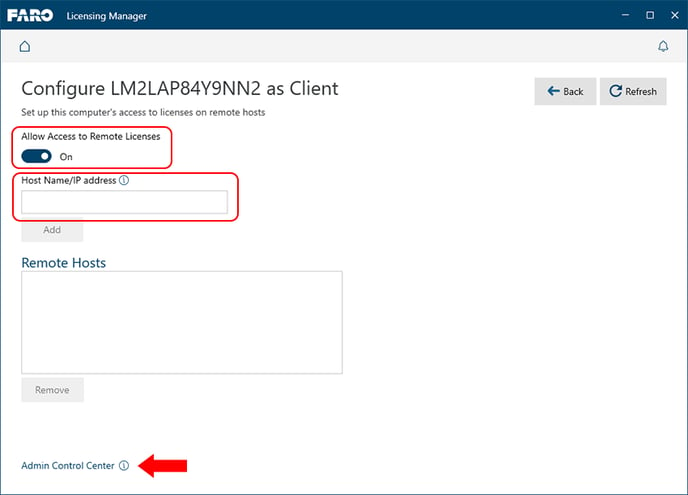
- Ensure the "Allow Access to Remote License" slider is On.
- In the Host Name/IP address field, enter the IP address of the server.
- For advanced configuration options, click on the Admin Control Center link (red arrow).
- Open the Licensing Manager and click on Configure Network. For more information on installing the Licensing Manager see the section Installation - Via FARO InTouch at the top of this article.
- Open FARO software on the client computer to confirm that the client computer automatically finds a key on the server without asking for a key or running on a trial license.
If you have a network license server that uses alphanumeric license keys, and not a dongle, you can detach a key from the server and assign it to a client computer. This enables the client to run FARO software when it is not attached to the network. You can assign the detached key an expiration date, when that date is reached the detached key is automatically disabled on the client and restored to server. For more information, see: Network License Server and Client Configuration
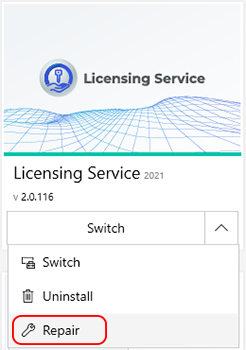
HASP Driver Update and Repair
|
The Licensing Manager also offers a convenient way of updating and repairing the HASP Driver. The HASP driver is the central backend component of the FARO software licensing system.
|
|