Troubleshooting Steps:
- Check the charger. If you are missing the tabs below, it will kill the batteries.
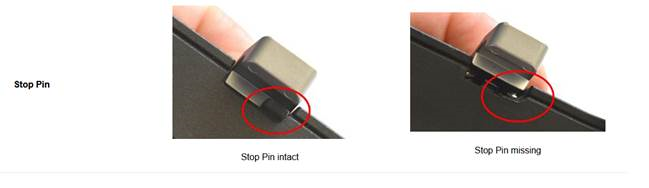
- Look at the charger. There are two little black tabs (stop pin) on the ends of the charger (inside). Is either of them broken? If they are, please tell us so we can replace them. That charger is killing your batteries and will continue to destroy all batteries if that tab is missing.
If troubleshooting doesn't work...
These are smart batteries that may need to be reset following the instructions below.
Put the latest firmware on the scanner
Follow the directions below to download the latest firmware. You need this firmware to make the new batteries work properly! We recommend doing it from an SD card, not a wi-fi connection. Note: If it is a capital letter, be sure to make it capital!
Transfer .LsSetup file From the Computer to the Scanner
The latest version of the firmware is 6.8.1, released 10 December 2021.
- Click here to download the firmware.
Note: Write down the version number that has the format x.x.x.xxxxx in the .LsSetup file name. - Insert and open the SD card on your PC. If an Updates folder already exists at the top level, delete it.
- Create a new Updates folder at the top level. Make sure you capitalize the U.
- Copy the .LsSetup file into the new Updates folder and rename the file to firmware.LsSetup.
- Eject the SD card, and put it into the scanner.
- The scanner will perform an initial check of the update file. This may take a minute or two. Wait until the SD card icon in the header bar stops flashing and disappears.
Install the firmware update
- Plug your scanner into an outlet and verify the battery is charged. This ensures that, if there is a power outage, the upgrade will not be interrupted.
- From the Home screen, navigate to Manage > Service > Firmware Update.
- Verify that Enable Online Updates is OFF.
- Select Search for Updates Now.
- Select Install.
- The update will transfer to the scanner's internal memory, and the installation will be gin automatically. Do not power down the scanner during the update process.
- The scanner will reboot several times. This process may take up to 30 minutes.
- When the update is complete, “Firmware installed successfully” will appear on the scanner’s display.
- Confirm results.
- Go to Manage > General Settings > Scanner Details.
- Check that the Firmware Revision version number matches the latest version: Premium and Core | M and S Series
After you install the latest firmware
- Plug the scanner into the wall outlet without the battery in it.
- Turn the scanner on (let it boot up all of the way!)
- Put the battery inside of the scanner.
- Unplug the unit from the wall…the battery should reset and the unit should stay on if it is charged.
Additional information on FARO scanner hardware: https://knowledge.faro.com/Hardware/3D_Scanners/Focus